Easy Installation - Just measure, cut, glue, caulk, paint.
Measuring and Installation
StyroTrim stucco architectural accents are not only high quality, long-lasting, affordable stucco and cement-coated treatments, they are very easy to install.
Before placing an order, obtain the measurements of the wall, window or door areas where you intend to install the treatments.
All stucco StyroTrim sills, flat trims, deco trims and crown mouldings come in 85” length
strips, except for finished-end sills that can be ordered in custom lengths. You will use the strips in varying sizes and may need to cut them
down to specific widths. StyroTrim can be cut or mitered easily and fit
together to trim out most any opening. When placing your order, you need to indicate how
many 85” strips of each trim style you need for your project.
Window and Door Trim Measurements
 When
measuring windows and doors, be sure to account for the width of the trim on all
sides. Because the trim should be cut at 45 degrees at each corner, you should
measure to the outside finished corners for the trim. For "framed" windows, add
together both side heights and top and bottom widths to get the total
measurement. When
measuring windows and doors, be sure to account for the width of the trim on all
sides. Because the trim should be cut at 45 degrees at each corner, you should
measure to the outside finished corners for the trim. For "framed" windows, add
together both side heights and top and bottom widths to get the total
measurement.
For example, a four-foot wide by three-foot high window with 6"
trim on all
four sides measures:
2 x (48"
+ 6"
+ 6"
) + 2 x (36"
+ 6"
+ 6"
) = 216"
Divide 216"
by 85"
(piece length) = 2.54 pieces. This window needs three(3) 85"
length pieces of trim.
Window Sills
 Suppose
your window has trim on the sides and the top, with a window sill at the
bottom. Since your window sill will typically extend beyond the trim (E) on each
side of the window you will need to compensate for these widths when ordering your
finished-end sill. The total sill length will be the width of the window, plus
two trim widths (W), plus the amount (E) you want to extend beyond the trim on
both sides. This will be your finished-end sill piece length. Suppose
your window has trim on the sides and the top, with a window sill at the
bottom. Since your window sill will typically extend beyond the trim (E) on each
side of the window you will need to compensate for these widths when ordering your
finished-end sill. The total sill length will be the width of the window, plus
two trim widths (W), plus the amount (E) you want to extend beyond the trim on
both sides. This will be your finished-end sill piece length.
For example, suppose your window is 60"
wide and you want your window sill to
extend 6"
beyond each side of the 6"
wide window trim. Add the window width
60"
+ ( 2 x 6"
trim widths)+ (2 x 6"
extensions each side) = 84"
of sill
needed. Simply specify an 84"
sill with finished ends when you order.
Cutting Window Sill Returns
If you purchased
stock sills with finished end returns,
please disregard these instructions.
If you purchase 85-inch
accent sills, please follow these
instructions to achieve a finished
return to your wall on each side of the
window.
The cuts you make on
both ends of your sill for these returns
are why you must add extra lengths to
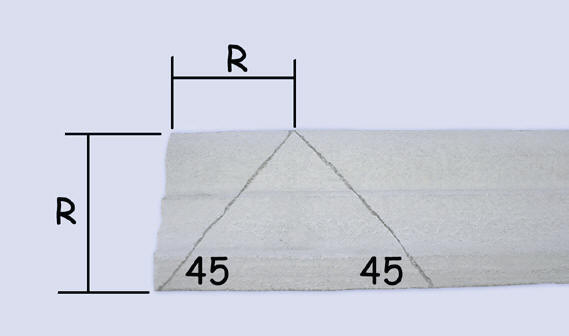
your sill measurements. Lay sill
flat-side down. At one end of your
sill, measure the return depth of the
flat side of the sill stick and mark it
on the sill face (d). At this
point, you will need to cut two miters
(an "upside down" V ) in the sill with
the point of the V at the place you
marked. Each cut must be 45
degrees as shown. By doing this,
you will cut two pieces from the sill.
|
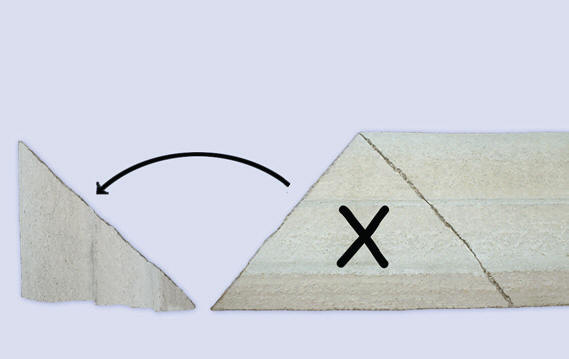
The middle piece
that's a full triangle and mostly all
foam will be discarded and the one that
remains (with the most finished surface)
becomes the return. Flip end piece
which, will be used as the
return. Repeat procedure for return on
other side of sill.
|
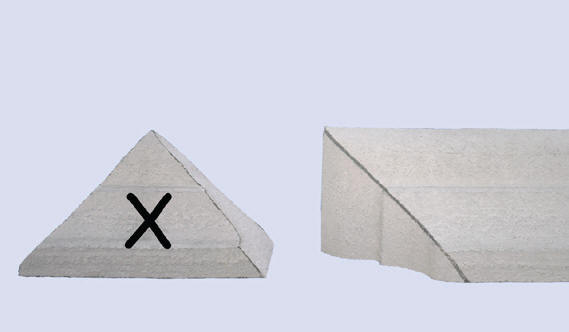
Slide the end piece
over to the wedge cut in the sill and
assemble using glue, such as 100% clear
silicone. Repeat on the opposite
side of the sill. Create both
returns on the sill first before gluing
sill to the wall. You may even use
toothpicks or nails to hold the end
pieces to the sill while the glue dries.
Seams must be "StyroCaulk" filled.
|
Optional Pre-finished Ends
StyroTrim window sills may also be ordered with finished ends so the
above procedure will be unnecessary. Order your sills with finished ends
by giving us the sill length (in inches) you need.
Arches
StyroTrim window and door arches may also be ordered in every style of
trim available. Your arch size and shape is as simple as giving us the inside
width and the inside height measurements. Circles can be made by using 2 arches
of equal size.
Installation
Here are some basic tools and materials needed to install your new StyroTrim accents:
- Standard (disposable) wood saw or power saw with masonry blade.
- S-curved bead of clear 100 percent silicone (glue)
- Caulking
- Paint or color coating
Your StyroTrim treatments will arrive in 85-inch strip lengths. Follow these steps to cut, glue, caulk, and install your treatments:
 
Step 1: Using a standard (disposable) wood saw or power saw
with a masonry blade, cut through
the outer exterior finish and foam core of your trim to the desired lengths (for a miter,
cut the corners diagonally just as you would any other trim, like wood).
Step 2: Glue your treatments to the wall, window or door
using a low solvent exterior construction adhesive. We recommend a
generous S-curved bead of clear 100 percent silicone. Examples of suitable
adhesives are: GE Silicone II 100% Silicone Household Glue, Liquid Nails
Construction Adhesive, or Loctite PL 300 VOC Foamboard Adhesive. Apply the
glue or silicone liberally on the inside of the treatments but avoid the
surface you wish to paint. Firmly place
the treatment against the structure and hold for several seconds.
TIP: Double-sided foam tape holds the treatment against
the structure to allow the adhesive to cure. You may also temporarily
use strips of masking tape across the outside surface of the
trim to hold in place until the adhesive cures. On heavier installations, a nail or screw can
be driven into the wall first (then cut the heads off) and used to pin the accent to keep
it in place while the adhesive cures.
Step 3: Once the adhesive dries and the treatments are
secure against the structure, fill any seams or gaps with stucco patch
or our exclusive StyroCaulk caulking.
Step 4: Treatments are now ready for painting or color
coating with the
color or finish of your choice.
"I was very skeptical as to how easy it would
be, but the whole job took much less time than I
had anticipated. The installation instructions are easy to follow, even for a
non-handyperson like myself".
Wendy DeMico, Syracuse, NY.
|
 Coast to Coast Delivery


